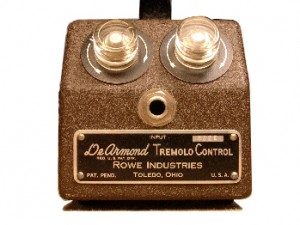
A DeArmond Tremolo unit. The earliest versions will have black knobs. Soon after appeared these transparent knobs.
An unofficial site about DeArmond Tremolo Control and Trem-Trol units.
Introduction:
Sound clip: To begin, the first thing you may want to do is hear a DeArmond Tremolo unit – a sound clip is here (mp3 format). The clip is in three parts. First no tremolo, then fast, then slow. This clip was made with a 1955 Gretsch Country Club through a 1950s Champ-size Rickenbacker amp, 6-inch speaker, and played slowly so you can hear the tremolo. More sound clips may be coming soon.
Overview
DeArmond’s Tremolo Control units first appeared in 1941. The earliest reference obtained appears in the August 1941 issue of Presto Music Times. DeArmond tremolo units were attached to the underside of the keyboard of Storytone pianos, the first-ever electric pianos. (More on this below.)
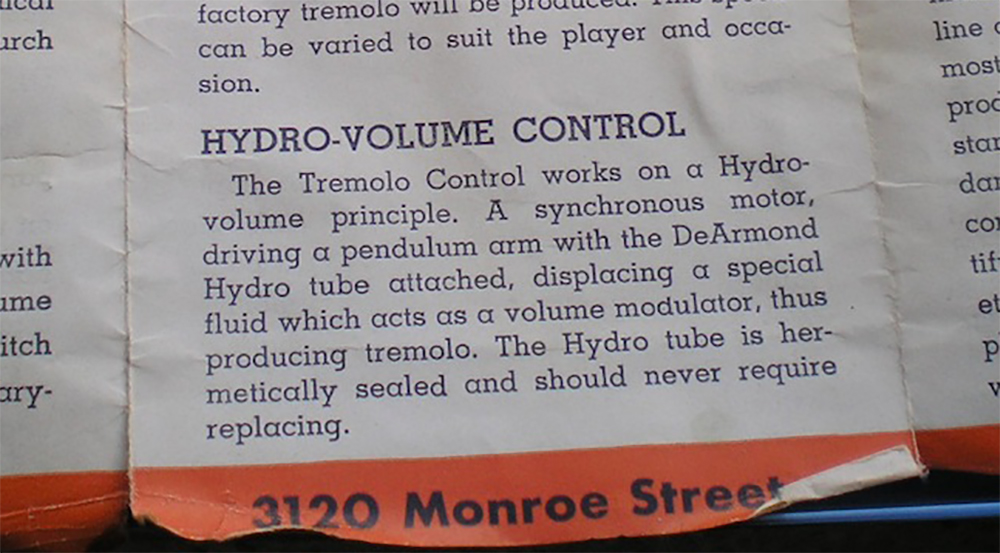
The tremolo units are purely mechanical devices. The tremolo effect is produced by reducing the volume of the input signal from the guitar (or other instrument) to the amplifier, several times a second. This is accomplished by grounding the input signal through a water-based electrolytic “hydro-fluid” contained within an oscillating canister. The water-based method by which the input signal is grounded, as you would guess, gives the DeArmond tremolo units their unique liquid sound. Here is basically how it works:
- A guitar or other instrument plugs into the tremolo unit, which is plugged into the amplifier.
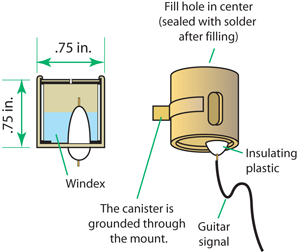
- Inside the tremolo unit is a liquid-filled brass and glass canister, filled halfway with what DeArmond called a “hydro-fluid”. The body of the canister is connected to ground. Inside the canister, insulated from the body, is an exposed pin connected to the incoming signal from the guitar.
- A motor shakes the canister. When shaken, the liquid inside the canister splashes against the pin sending the guitar signal to ground – meaning, the volume is reduced with every splash.

A DeArmond Tremolo unit. The earliest versions will have black knobs. Soon after appeared these transparent knobs.
“Hydro-Fluid”
DeArmond’s hydro-fluid is a water-based electrolytic fluid, meaning it can conduct the signal coming from the guitar – the fluid is part of the circuit. Although it seems like it would be permanently sealed within the brass canister, the fluid typically dries out over the years. But it can be refilled. The fluid was NOT MERCURY, as some people assume. In fact, the reason I became curious about the DeArmond tremolo units in the first place, years ago, is by wondering, if it were mercury, where did it go?
Every DeArmond canister eventually dries out. Remember liquid mercury from chemistry class? Mercury is too thick to leak. And although it can evaporate, even in the 1940’s the dangers were known and I suspect mercury would have been sealed in a glass bulb the way mercury switches are made today. The real give-away: the term used in DeArmond’s brochures, “hydro-fluid,” obviously implies a water-based liquid. (In some printed materials DeArmond alternatively used the term “hydro-volume.”)
The hydro-fluid can be restored using Windex (yes, the blue glass cleaner that has been on the market for decades in the US). After a long search I received this information secondhand from someone who had spoken to an ex-DeArmond employee. I do not know if DeArmond originally used the Windex brand, or its chemical equivalent. However, Windex conducts the guitar signal perfectly.
Note: Don’t even think about refilling the canisters in these units with mercury, or replacing the canister with a mercury switch. Mercury is dangerous, isn’t correct to the liquid sound of DeArmond units, and mercury will “click” with each oscillation, making it unusable. Mercury would also create an abrupt square-wave tremolo, either completely on or off, and not the smooth water-like tremolo sound of an original DeArmond unit. (I acquired a unit ruined by someone who tried to fix it by replacing the original brass canister with a mercury switch. Now to restore it I need to replicate the original brass and glass canister. Grrrr!!)
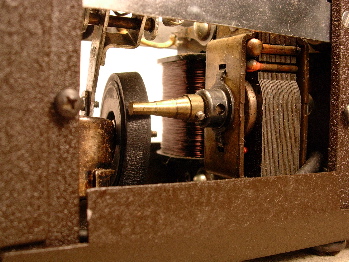
The tremolo speed knob slides a rubber "rocker wheel" along a tapered pin, changing its rotation rate. The motor's speed remains constant.
Speed control
The other beautiful part of the DeArmond mechanism is the method by which the tremolo speed is controlled. A motor is used to shake the canister. A tapered pin extends from the motor’s shaft. Pressing against that pin, somewhere along the taper, is a rubber-edged wheel. The wheel’s hub is slightly off center. When the motor is on, the pin causes the wheel to turn, which causes the wheel’s true center to move back and forth. Because the hydro-fluid canister is attached to the true center of the wheel the canister gently rocks.
DeArmond’s speed adjustment knob positions the rubber-edged wheel somewhere along the tapered pin (the knob on the right on the 601 unit and the thumbwheel on the 800 unit are both mechanical cam-like linkages, not potentiometers). When against the far, narrow end of the pin, the wheel rotates more slowly. At the fatter end of the pin the wheel rotates more quickly. The motor’s speed remains constant.
Subtractive tremolo – why the volume sounds lower
The peak volume of the tremolo is virtually the same volume as if the tremolo were not connected. However, with the tremolo on, the volume of the signal is lowered several times a second. The result is a tremolo unit that reduces the perceived overall volume. So be prepared to turn up the volume on your guitar or your amplifier when using a DeArmond tremolo.
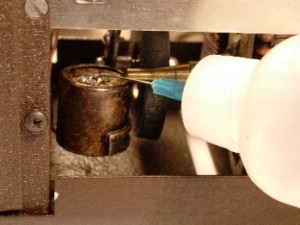
Filling the canister requires a hobby syringe or, in this photo, a squeeze bottle with a needle tip.
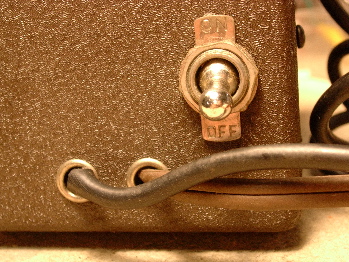
On/Off switch on the back of Model 60. The instrument cable and power cord often need to be replaced. Canare's GS-4 instrument cable is the correct diameter.
Cross-section and underside view.
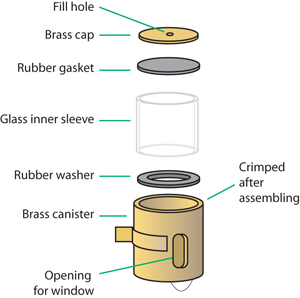
Canister, exploded view.
Restoration
Restoring a non-functioning DeArmond tremolo typically means refilling the canister, and likely replacing its instrument cable and power cord. To do this you will need:
• a soldering iron
• de-soldering braid or a de-soldering bulb
• Windex
• a syringe (I use a version available at hobby stores)
For replacing the cords:
• a household extension cord, with the socket end cut off
• a relatively small diameter instrument cable. The Canare GS-4 is perfect
In the 601, 60A and 60B models (the box-shaped models) the brass canisters are easier to access. The 800 model foot pedal is a little more difficult, requiring some disassembly to gain access to the canister. With any model, the canister itself does not need to be removed from its position in the assembly. However, on the 800 foot-pedal model, the entire assembly needs to be removed to gain access to the canister.
WARNING: Be sure to UNPLUG the unit before any attempt at disassembly. Also, do not attempt to restore this unit unless you are certain you know what you are doing, know how to solder, and take all necessary precautions. Because power cord and the instrument cable often deteriorate over the decades, be sure to inspect these cords and be prepared to replace theem if necessary.
Another warning – DO NOT try to disassemble the canister. There is no need. The inner glass sleeve is very breakable and extremely difficult to replace.
I’ll describe how to restore a DeArmond tremolo using the older brown, metal box version as an example (models 601 or 60A). The later model 60B (with the plastic housing) and the 800 foot-pedal models require different methods of disassembly – their internal mechanisms are arranged a bit differently, although their brass canisters and the tremolo they produce are identical.
To gain access to, and to refill the canister, on a model 601 or 60A (metal box) unit:
1. Unplug the tremolo unit. Remove the metal cover by removing the four screws holding it in place. Spin the rubber-edged wheel to make sure the springs and linkages are in place and operating correctly.
2. Locate the brass canister. Use a soldering iron to carefully remove the solder that covers the canister’s fill hole. (The fill hole is opposite from the end that has the braided copper signal wire attached. It’s the end that faces “up” when the tremolo unit is used.) Access to it is a little tight, so be careful not to let the soldering iron touch or ruin any other parts. Also, be VERY careful not to let any heated solder drip into the canister. (Working with the canister sideways or upside-down will help.)
3. Fill the syringe with Windex. Watching the markings on the syringe, inject 1.5 cc (1.5 milliliters) of Windex into the canister – filling it exactly halfway. When inserting the syringe’s needle into the canister, you may need to pierce the rubber gasket immediately within the canister’s fill hole. Do this with care. A sewing needle or push-pin may help to gently pierce the gasket before inserting the syringe needle.
Note: If the needle on your syringe isn’t long enough to reach the canister you may need to get creative. If you need to bend the needle on the syringe, slide a guitar string into the needle, bend it, then remove the guitar string. This will allow you to create a bend without kinking the needle.
4. Cover the canister’s fill hole. With 1.5 cc of fluid now in the canister, temporarily seal the canister’s fill hole. This can be done with a small piece of masking tape. This will allow you to go back in to fine-tune the level of fluid if you need to, prior to re-sealing it.
5. Reassemble the tremolo unit and try it. While it is running, tilt the tremolo unit slightly from side to side. If the tremolo sounds stronger when tilted you have too little or too much fluid. It should be easy to determine which by noticing that the internal “guitar signal” pin is not in the center of the canister (see below). Unplug the unit and adjust the fluid level. (You’ll notice at this point that the critical advantage of using a syringe is that it allows you to accurately add and remove fluid.)
6. Add or remove fluid as needed. Repeat steps 4 and 5. Once the fluid level is allowing the tremolo to sound its strongest, permanently reseal the canister by re-soldering the canister hole.
Tip: On several of my DeArmond units I used a small brass pin or tiny brass screw to help seal the fill hole. Place it in the hole – the head will prevent it from falling through. Then solder over the head. This makes it easier to reseal, and it’s a nice trick to help get back into the canister when that becomes necessary again in the future. (On recent restorations I have soldered a small brass nut over the hole. Then used a tiny brass screw with an O-ring to seal it. This makes the canister easily refillable in the future. However, these are tiny, microscopic (jewelry-like) hardware parts that can be very difficult to find – I wouldn’t recommend this unless these super-tiny parts can be found, and you have a lot of patience.)
Adjusting the fluid level
To elaborate on step 5, after you fill the canister halfway the first time, reassemble and run the unit to test it. You will hear the “fullest” tremolo sound simply by tilting the unit to one side or the other when it is running. This does essentially the same thing as adding or removing fluid. If it sounds better when tilted, you need to add or remove fluid. You can determine which. Notice that the canister’s internal pin is not in the exact center of the canister. If the tremolo sounds stronger tilted towards the pin, you need to add some fluid. If it sounds stronger tilted away from the pin, you need to remove some fluid. The goal, of course, is to adjust the fluid level so that the tremolo sounds its fullest when it is sitting level.
While you are in there… add a drop of oil to the hub of the rubber-edged wheel (it can sometimes bind). Also oil the other linkages and moving parts. Keep oil away from the rubber edge of the wheel and the tapered pin, or just wipe it clean if you accidentally apply oil there. Spray electronic contact cleaner (DeoxIT) into the potentiometer to prevent scratchy sounds.
Replacing the power cord and instrument cable
As mentioned, the power cords on DeArmond units often crack and can be dangerous. Replacing one is relatively easy. Buy a brown extension cord at the hardware store and cut off the socket end. Extension cords are easy to find, inexpensive, color-accurate, and will give you a new cord with a molded 2-prong plug, ready to install. Of course, if power cord replacement is needed, you must do this step first, since you will need to plug it in to test the tremolo after you refill the canister.
As mentioned, for replacing the instrument cable, the diameter of the Canare GS-4 is a good match to the original cable.

DeArmond Model 601 Tremolo Control
Wiring diagram of the DeArmond Model 60 Tremolo Control

DeArmond Model 800 Trem-Trol
Wiring diagram of the DeArmond Model 800 Trem-Trol
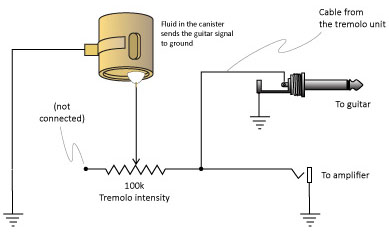
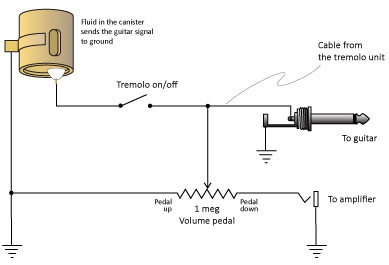
DeArmond Tremolo schematics
Back in January 2012 I (finally) drew up schematics of both the 601 and 800 tremolo units and added them to this page. Note that these are unofficial schematics (I have never seen one from DeArmond). The schematic at top shows the 601 model, which has a circuit that controls the intensity of the tremolo. (The potentiometer in the schematic is the knob on the left, labeled “increase”). The schematic at bottom shows the 800 – the foot pedal model. The pedal on the 800 controls overall volume, but not tremolo intensity. Although the thumb wheel on the 800 unit is labeled “increase,” it controls the speed, not the intensity – an inconsistent use of the term between the two models.
Since the speed adjustments on both units are mechanical, speed control is not represented in these circuit schematics.
Note: The 100k potentiometer value on the 601 model needs to be confirmed. One of my units measures 130k – it may have drifted. Also, do not be concerned if the tremolo is not heard throughout the range of the 601 “Increase” control. The tremolo effect may cut out early.
Questions?
This site is in no way affiliated with the DeArmond or Rowe Industries. I have a personal collection of DeArmond tremolo units – it’s simply a personal interest. I am not an amp tech, although I sometimes help people restore their units. Especially, I prevent people from mistakenly messing with liquid mercury, or otherwise ruining these units. It’s my contribution to society.
If you have a DeArmond tremolo unit that needs to be restored and you have questions not answered here, let me know. Depending on my schedule I may or may not be able to get back to you right away – but give it a try. Also, I sometimes get the urge to add to my collection, so if you have a DeArmond tremolo unit for sale let me know!!
Dan Formosa < email
© Dan Formosa 2017.

Good to know:
The History of Tremolo: I put some notes together on what I have gathered about the history of guitar tremolo. Meanwhile, if you have any information, thoughts or references to early recordings (1940s or early 50s), PLEASE let me know.
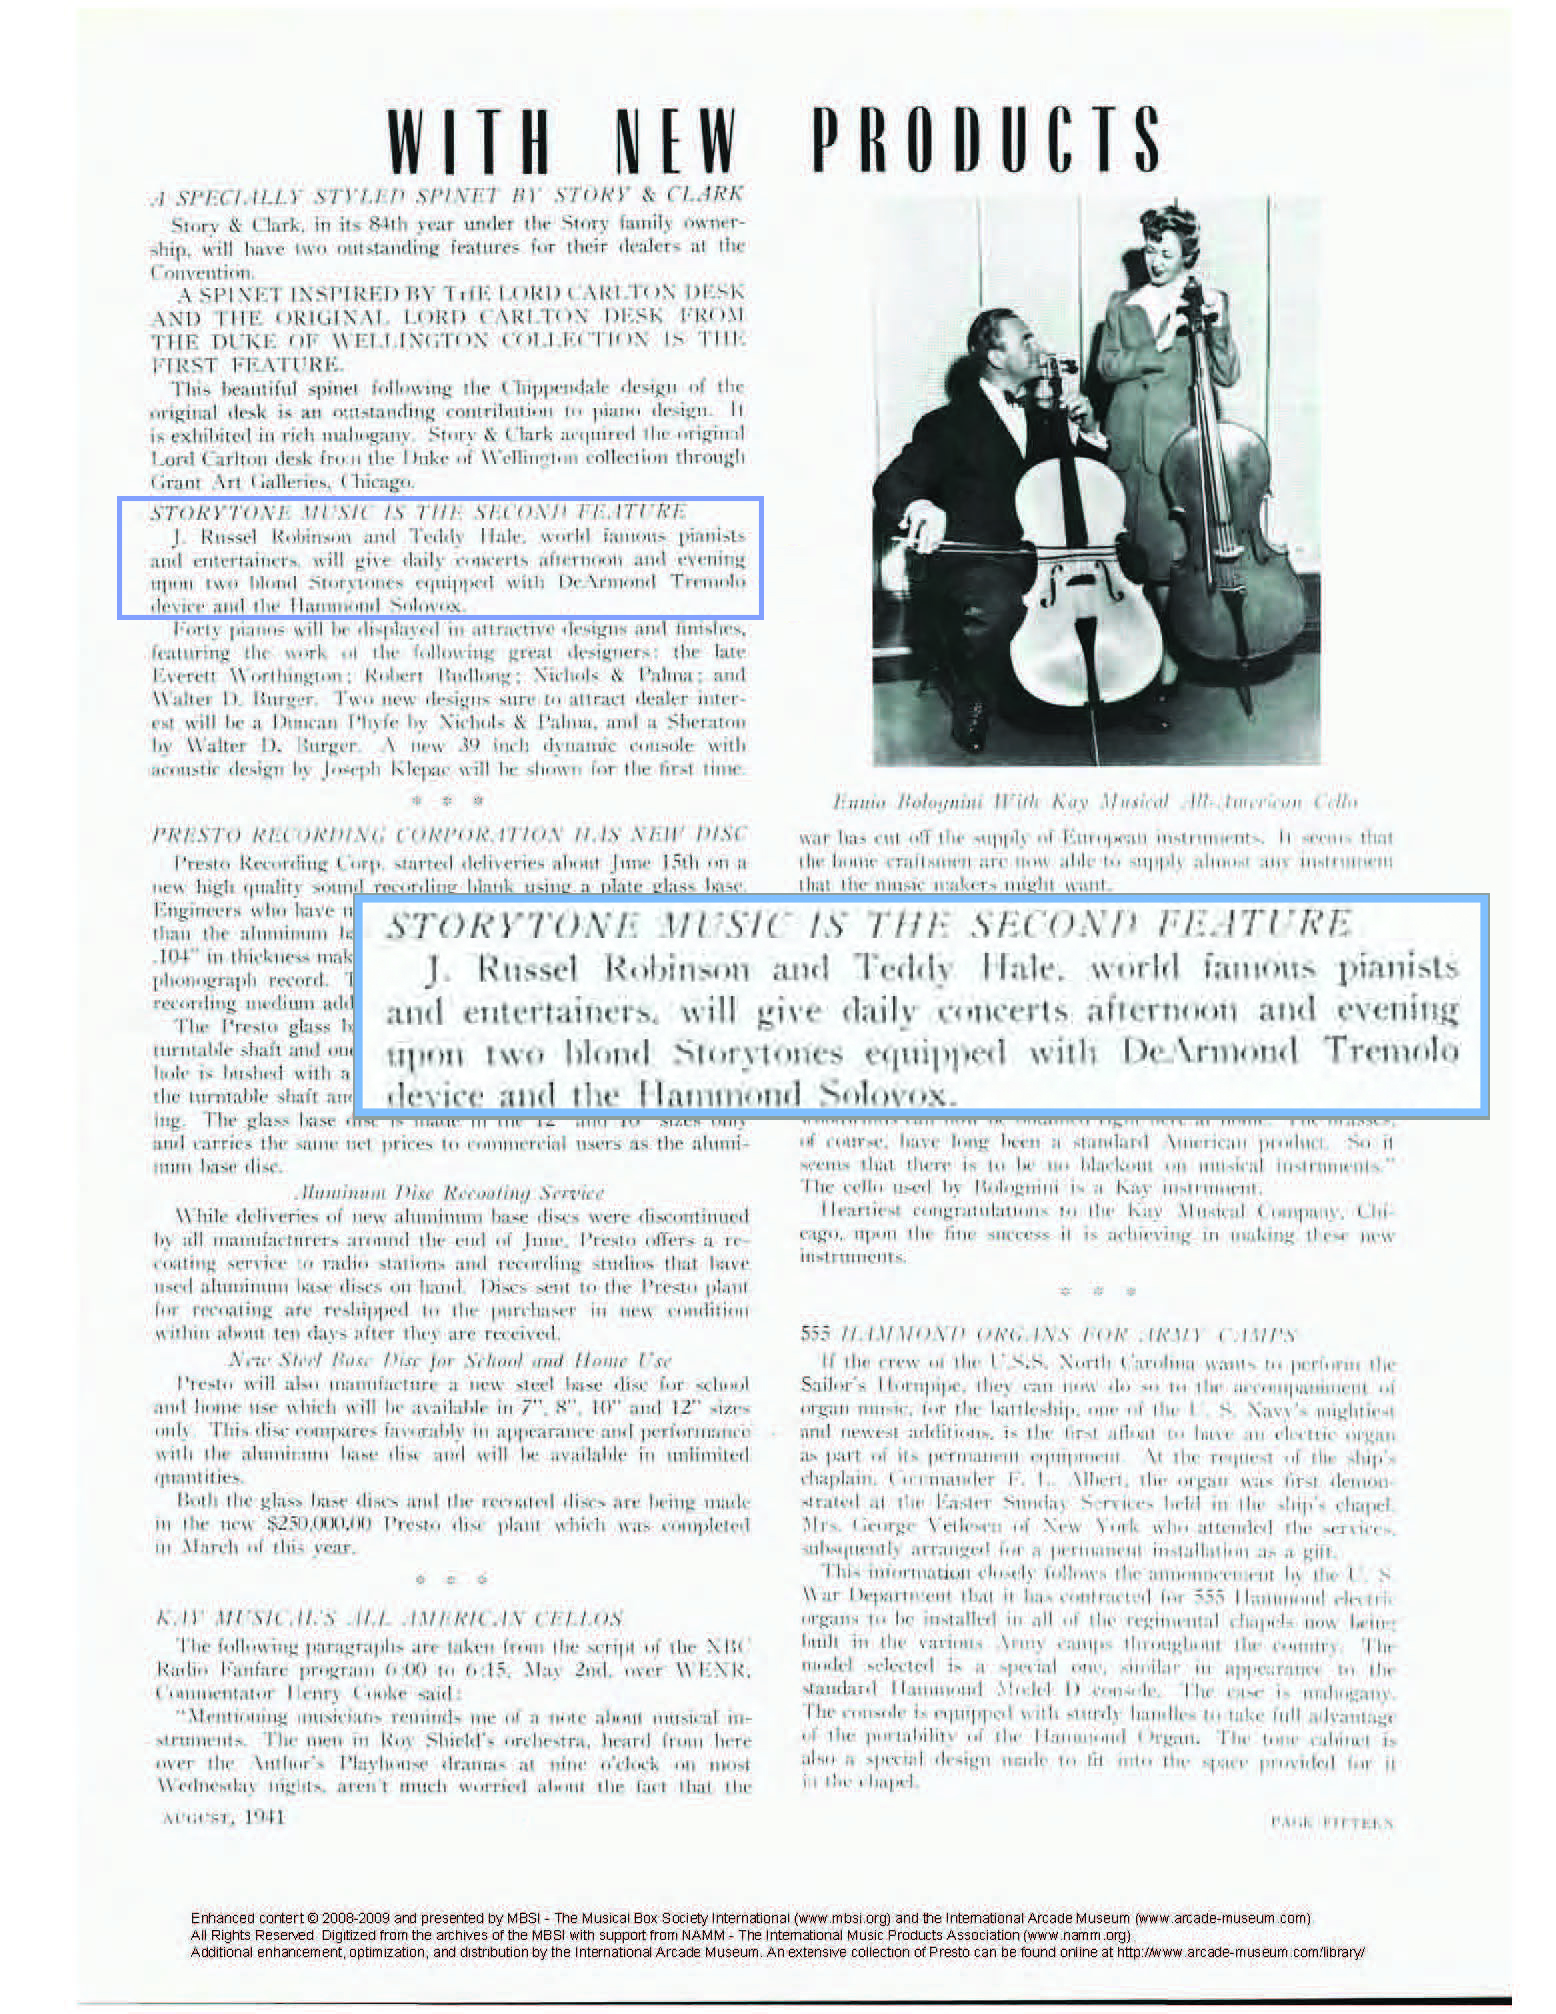
How old are they?: The very earliest DeArmond units used a glass jar to hold the liquid, not the brass canister assembly shown in the diagrams here. Previously the earliest reference I received was from Scott Davis, who contacted me about his early 601 unit. Scott’s DeArmond manual has a date of “7-46,” 1946. However, Troy Wierenga recently sent me information confirming that the DeArmond tremolo units date back to at least 1941 (and possibly 1939). An article appearing in the August 1941 issue of Presto Music Times mentions DeArmond tremolo units attached to Storytone pianos (the first-ever electric pianos.) Some still exist – see the (unfortunately low-resolution) photo to the left, I circled the DeArmond unit.
I know of at least one instance where a current Storytone owner removed the DeArmond unit prior to selling it, thinking it was a much later addition. I’m also suspicious when I see a DeArmond unit that’s missing its handle – it may have previously been attached to a Storytone piano.
Production would have been halted during World War II, with manufacturing resuming in 1946. Changes to the canister (from glass to brass,) and the use of clear plastic knobs indicate the post WWII units – just my speculation.
Prices: How to find a DeArmond tremolo unit, and current prices, are popular questions. DeArmond tremolo units come up for sale with some frequency. You may be able to find one in good condition for anywhere between $200 (a good low price) and $400 (high but still reasonable price), depending on condition. The gray plastic 60B units can be found in the lower range, and use the same tremolo mechanism. If the unit has been recently restored (a process that can take two hours or more, assuming you’ve had some practice), prices may be higher. Ebay frenzy can drive prices much, much higher – $600. and more. If you’re vey lucky (like my pal Craig) and you like yard sales you can possibly find a 601 model in absolutely mint condition for $2.00!